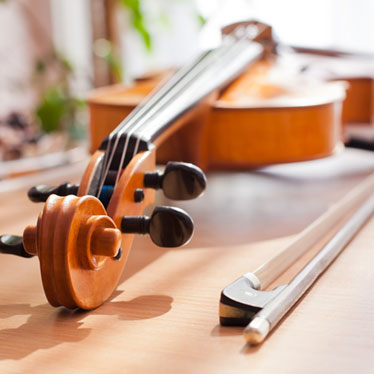
- Introduction to Our Guide on Violin Strings
- How Do Violin Strings Work
- How to Tune Your Violin Strings
- How to Tighten Loose Violin Strings
- When Is It Time to Change Your Violin Strings
- How to Change Your Violin Strings
- How to Break In New Violin Strings Before a Concert
- Things to Consider Before Purchasing Violin Strings
1. Introduction to Our Guide on Violin Strings
“When you play a violin piece, you are a storyteller, and you're telling a story.”
– Joshua Bell
Some people tell stories through their writings – poems that are written in ink, outlines scribbled in pencil, and books typed on a computer. Yet, not every story is told in words. In fact, the world’s greatest tales are often told through music. And just as writers need tools to compose their masterpieces, so do musicians.
We’re not just talking about their instruments. We’re talking about the many different pieces that compose them – specifically, the strings. While they may vary significantly by brands, type, and purpose, each string is as unique as the performer who uses them.
With the thousands of violin string choices that exist, this guide is designed to help musicians at every level choose which ones are right for them. But first, let’s take a closer look at the role strings play in producing sound and how musicians can best care for them.
2. How Do Violin Strings Work?
 To understand how violin strings work, we must realize – at least on a fundamental level – how sound itself functions. The physics behind this can get quite complicated, but we’ll do our best to keep it simple.
How sound works (for beginners)
Sound occurs when an object vibrates. These vibrations make air molecules move, allowing the vibrations to reach our ears. Upon arrival, the sound waves vibrate our eardrums in the same manner the object itself was vibrating.
Sound waves, which are longitudinal, are nothing more than a sequence of compression and rarefaction. Compression occurs when the air molecules are pushed together, and rarefaction occurs when the molecules are pulled apart.
The role strings play in sound
There are seven core parts of a violin that play significant roles in the sound it makes: strings, bow, bridge, sound post, bass bar, body, and F holes. Today we will just be reviewing strings. However, you can read more about the impact each element has on our blog, How Your Violin Produces Sound.
Strings play a crucial role in how your violin vibrates, and as a result, sounds. Critical factors that affect the sound produced include the length, mass, and tension of your violin strings.
- The length of your strings helps determine the frequency. Frequency, in turn, affects the pitch. Shorter strings have a higher pitch, and longer strings offer a lower pitch.
- Strings with a greater mass vibrate more slowly than thinner strings with less mass.
- Tension also affects your violin’s pitch — the tighter the strings, the higher the pitch.
Rosin’s critical role
When discussing violin strings, it’s important to mention the critical role rosin plays in the production of sound. Made primarily from heated, purified pine sap (among other ingredients), rosin is the conduit responsible for causing friction between the strings and bows. Without rosin, there would be no vibration. No vibration = no sound.
The color and consistency of rosin are determined by the time of year in which the sap is collected, along with its additional ingredients, and each type is used for a different purpose.
Darker rosin: Best for cellos with thicker strings, dark rosin has a strong grip and produces a grittier sound (and more dust) than other rosin types.
Lighter rosin: Lighter rosins do not have the same grip as darker rosin, and they’re not as sticky either. This makes it ideal for lighter gauge strings typically found on violins and violas.
Choosing a quality rosin product is critical to achieving the sound you desire. Just keep in mind the following:
- Dark rosin is more suitable for dry and cool climates, while light rosin is a better match for hot, humid climates.
- A new cake of rosin needs to be “started” before rosin can cling to the bow hair. This can be done by scoring or scratching the surface with a pocket knife, sandpaper, or an already-rosined bow. Magic Rosin is a product that does not need to be scored.
- To apply rosin, use long slow strokes along the bow's entire length, moving in both up- and down-bow strokes until the hair grips the string when used on the instrument.
- Avoid wearing a channel into the rosin. Deeply grooved rosin can damage the sides of the bow.
- After each practice session, clean excess rosin residue off your bow, instrument, and strings. Excess rosin on the string can affect the playability and response.
- Depending on how much you play, rosining is rarely needed more than twice a week. (Less is More!)
- If you think the rosin isn’t working and the bow hair is no longer gripping, then it’s time to rehair your bow.
3. How to Tune Your Violin Strings
 Because your violin is made from wood, it is continually expanding or contracting. As a result of both temperature and humidity changes, your strings will require routine tuning to stay on pitch.
Learning how to tune your instrument properly is an essential skill every musician must possess. If you cannot determine if a string is adequately tuned auditorily, you should use a digital tuner. These devices will visually indicate whether you need to raise or lower the pitch.
Begin by tuning the A string, 440 (A4), first. You can then move on to the other strings: D, G and E.
Tuning instructions:
- Notice how the string is wound from the nut over the peg. Turning the peg away from you will cause the string to tighten. Turning it towards you will loosen it.
- Pegs are tapered and held in place through the friction of wood on wood. To secure, turn and push in simultaneously toward the peg box (as you would a screwdriver). When loosening, turning towards you and then tightening works well because of the lower tension.
- Instruments with steel strings (most often cellos) should be equipped with “fine tuners”. These are located on the tail piece to which the string is attached. Simply turn the tuner clockwise to tighten or counterclockwise to loosen the strings.
- If the string is far off pitch, use the peg. If it’s close to the desired pitch, adjust with the fine tuner.
4. How to Tighten Loose Violin Strings
Do you find that you’re constantly losing string tension?If so, the following four culprits may be to blame. Pay close attention, as each requires a different approach to correct the root problem.
#1 Pegs Slip
If a peg has worn down, you should remove the peg and very gently rough up the surface with a super fine grit sandpaper. Don’t overdo it or you’ll wind up with an entirely different – and equally severe – set of problems. One gentle swipe is usually enough to do the trick.
Another alternative is to use peg dope; however, you don’t want to rely on this compound. Using it too much causes instrument swelling. Additionally, pegs can slip if a musician fails to apply adequate pressure while tuning. The only way to fix this is to keep practicing your tuning.
To learn more about correcting this issue, you can watch our video “Fix Creaking and Slipping Pegs on a Violin.”
#2 Changes in Temperature and Humidity
As we discussed earlier, your violin is sensitive to changes in both humidity levels and temperature. Its pieces are in a near-constant state of expansion or contraction. To combat these elements, be sure to store your violin in its case when not in use. Further, consider using a case humidifier. They’re worth the investment.
#3 Bridge Shifts
Make sure you’re properly lubricating the notches in your bridge using a graphite pencil. Otherwise, you can alter the vertical position of your bridge. If the back of the bridge is leaning toward the peg box, it makes it much easier for your strings to loosen.
#4 Improper Winding
If your strings aren’t properly wound, they will become loose more frequently. To correct this, tighten violin strings D & G counterclockwise and strings A & E clockwise. Additionally, you can lock the strings in place by beginning with the first loop on the peg (towards the pointy end) and then winding each successive loop outward.
Additional tips
- Ensure the string evenly coils around the peg as you turn it. Otherwise, you’ll have to repeatedly re-tighten it.
- Use a peg lubricant to ensure the peg turns freely, but still maintains the right amount of friction. You can purchase an entire year’s supply for around $15.
- Tighten strings A and E with a clockwise motion towards the scroll. Then tighten D & G strings counterclockwise.
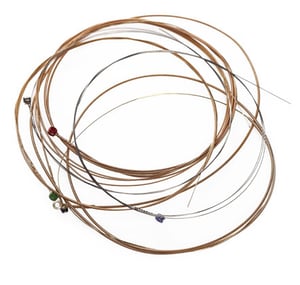
5. When Is It Time to Change Your Violin Strings?
 One of the most important parts of being a violinist is knowing when it’s time to change your strings. You don’t want to waste money by changing them too early, but waiting too long can cost you more than your hard-earned cash.
Strings can break during performances – causing both injuries and embarrassment. The deterioration in sound quality can cause you to question your abilities. And, the added pressure required to produce sound can lead to severe wrist and shoulder injuries.
To avoid these consequences, you need to take a proactive approach to string maintenance. We’ll get into tips you can use to make assessments of your strings. But first, let’s look at some of the most common causes of string wear and tear.
What causes your strings to wear out?
While there are many reasons your strings can wear down, here are four of the most common.
#1 String material
The type and brand of violin strings you choose will make a huge difference in how often they wear out. While strings made from gut have a rich, lovely tone, the string material breaks down much quicker than that of steel strings.
Steel strings are incredibly durable and last much longer without needing changing, however, many classical musicians steer clear from this option. This is why many musicians prefer to use synthetic nylon strings because they combine warm, rich tones with increased longevity.
#2 Playing habits
It should come as no surprise that the more you play your violin, the more frequently you will need to replace your strings. If you play or practice for around an hour a day, it makes sense to change your strings every 4 to 6 months.
If you’re playing and practicing more frequently than that, a good rule of thumb is to change your strings every 1 to 3 months. Regardless of playing habits, you should change your strings at least once every 9 to 12 months.
#3 Contact
Perspiration, dirt and dust, rosin build up, and oils from your hand often come into contact with your violin strings. As a result, they wear out even faster than normal. You can help slow down these effects by gently wiping your strings off with a dry cloth each time you finish playing.
#4 Instrument set-up
Sometimes instrument imperfections make your strings wear out sooner than expected. Imperfections can range from the way your bridge was cut to a nut that’s causing increased stress on your strings.
Making string assessments
The longer you play your violin and the more accustomed you become with your instrument, the easier it will be for you to assess string quality. The following tips will help you gauge when it’s time to bite the bullet and replace some or all of your strings.
Fraying: If you see even the slightest amount of fraying or unravelling, it’s a dead give away your strings need to be replaced. Do not hesitate here! Change the strings right away. Otherwise, you can sustain a serious injury.
Sound Quality: This is a much more subtle change to detect. Have you noticed a decline in your sound quality? Having trouble achieving the resonance to which you’re accustomed? Do you have to apply more pressure to produce the same sound? Then chances are it’s time to switch out those strings.
Tuning Difficulties: If you find that your strings require frequent adjustments to stay in tune or that they have become much harder to tune, say goodbye to those strings. The quality will continue to deteriorate until the headaches aren’t worth it.
General Dissatisfaction: Does something feel off? Maybe you tried a new brand, and they’re just not working out. Or perhaps you're satisfied with your current brand, but you want to shake things up a bit.
There’s no better way to energize your playing than with a fresh set of strings. You can always retain the “good” set, as it’s best to carry a “stretched” set of strings in the event one breaks at a concert or recital.
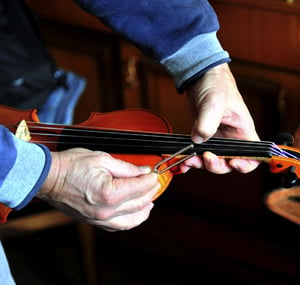
6. How to Change Your Violin Strings
 The best approach for changing your violin strings will depend on if you’re replacing a complete set or just one string. First, we’ll begin with changing a full set of strings.
Changing a complete set of strings
- Reminder: Never remove all four strings at once. You’ll need to remove and replace each string separately.
- Step 1: Slightly lower the pitch of each string using the following order: A, E, D, and G.
- Step 2: Remove and replace the G string first, and bring it almost up to pitch.
- Step 3: Remove and replace the remaining strings in the following order: E, D, and A.
Changing a single string
Step #1: After removing the peg from its hole, apply a small amount of peg compound to areas of the shaft that come into contact with the peg box. Turn several times until you feel the peg moving smoothly. If you encounter resistance, you might need more compound.
Step #2: Thread the string through the hole and only let an inch or less of the string come through the other side.
Step #3: Slowly turn the peg away from you and guide the string towards the inside of the peg box using the index finger of the hand that’s not turning the peg.
Step #4: While keeping your index finger against the string, turn the peg until the string is fully wound onto the peg. Be sure not to apply pressure here. If successful, you’ll notice a gradual tightening feeling as the excess sting winds onto the peg.
7. How to Break in New Violin Strings Before a Concert
If you’d like to learn how to get your new strings into concert-ready condition in about ten minutes, watch the below video featuring Chris from Thomastik-Infeld. While we’ve outlined the steps beneath the clip, watching Chris illustrate the process first would be most beneficial.
Step #1: Put your strings on the violin and bring them up to a full pitch.
Step #2: Warm up the G-string by taking your thumb and forefinger and with a little pressure on each finger, rub the string up and down. To prevent burning your fingers, grasp a microfiber cloth between your fingers. Take firm control of the instrument by the scroll, and rub up and down the G-string for about 15 seconds.
Step #3: Activate the G-string by bowing it right by the bridge. The sound won’t be pleasant, but it will be effective! About 4 to 5 bow strokes with pressure will get the string to actively vibrate where the string needs to settle in most.
Step #4: Repeat warming up the G-string for another 15 seconds.
Step #5: Activate the string by bowing it for the second time.
Step #6: Repeat warming up the G-string for another 15 seconds.
Step #7: Activate the string by bowing it for the third time.
Step #8: Gently reduce G-string’s pitch by 1 full step and bring it back up for final tuning.
Step #9: Repeat steps 2-8 for strings D, A, and E
8. Things to Consider Before Purchasing Violin Strings
Three Core Types of Violin Strings
Stringed instruments can use one of three distinct core types: gut core, steel core, and synthetic core. Each is capable of producing a beautiful – and unique – sound. 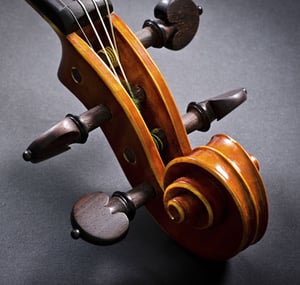
#1 Gut Core Strings
Made from sheep intestine and wound with varying metals, gut core strings are known for their warm and rich tones. This is why, prior to the development of synthetic core strings, they were the go-to choice for classical music professionals. However, there are both benefits and disadvantages to using these strings.
Gut core strings provide unmatched tonal depth. Additionally, their tension levels generate full volume with no problem. On the downside, they are far less responsive and require significant pressure to depress. Additionally, they are very susceptible to changes in humidity and temperature. As a result, they require frequent re-tuning — especially if you’re playing under the hot lights of a stage.
In addition to being less durable, they are also more expensive than other string types.
#2 Steel Core Strings
Prior to the invention of synthetic strings, steel core strings were the only alternative to gut core strings. Typically, musicians who enjoyed playing country, jazz, and bluegrass music preferred these strings for their bright tone and less complex sound.
Their metal core provides a greater pitch stability, and they are less likely to be affected by atmospheric conditions. This means they are not only easier to tune, but they require less tuning overall. Of course, they are not without their drawbacks. Steel core strings don’t produce the rich, warm tones of gut core strings. As a result, many musicians who prefer to perform classical music can’t use them.
#3 Synthetic Core Strings
Finally, there are synthetic core strings – which are preferred by seasoned professionals and beginners alike.
These strings combine the stability, durability, and responsiveness of steel core strings with the warmth of gut core strings. Once they’ve been properly stretched, they have great pitch stability and easily stay in tune. Changes in climate don’t affect these strings, as they are typically made from nylon or perlon.
We recommend beginners try synthetic core strings due to their excellent responsiveness and superb projection that helps beginners create amazing sound. Additionally, their affordable price point makes them accessible to musicians at every level.
Considering Tension and Gauge
Just as string core type can play a major role in the sound of your instrument, tension and gauge also have a tremendous impact.
Tension
Tension refers to the pulling force your strings exert when taut. You can determine the tension of a string by the metals it's wound with. The higher the tension, the more bright and responsive the sound.
Gauge
Gauge refers to the thickness – or mass – of a string. The lighter the string, the more your sound will be responsive and bright.
Note: There are no uniform standards for tension and gauge, so these can vary greatly from one manufacturer to the other. We recommend starting out with a medium gauge when evaluating new string brands.
A Great Place to Start
Not 100% certain where you should start? That’s okay! You can always change your mind later. Experiment with strings until you find a set that’s just right for you! A great place to start is Alphayue strings made by Thomastik-Infeld. They’re incredibly affordable and offer great playability, tone, and volume. They’re available for violin, viola, and cello.
In short, they’re perfect for beginners who are still figuring things out, as well as seasoned pros who are looking for a change.
This article is sponsored by Thomastik-Infeld.

Share this article
